Summer camps, field trips, spirit days, lock-ins—what do they all have in common? They’re better with matching shirts. And not just any shirts. Custom tie-dye shirts that every participant had a hand in creating.
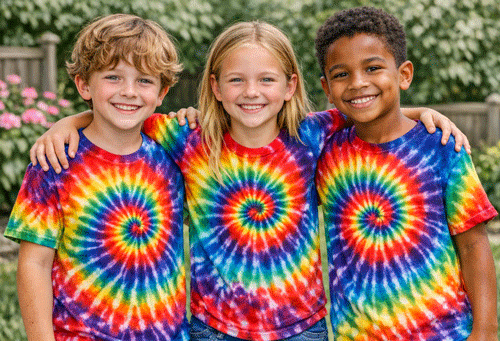
The beauty of a group tie-dye activity is the balance it strikes between individuality and unity. Start with T-shirts imprinted with your school or group’s name and logo, hand each person a set of rubber bands and some dye, and watch everyone produce something completely unique—while still looking like they belong together. It’s creativity, teamwork, and school spirit all rolled into one activity.
Whether you’re organizing a summer camp, a track and field day, a sporting event, or just an activity day that needs a little extra energy, learning how to make tie-dye shirts is easier than you might think. Here’s everything you need to know.
Materials Needed for Tie-Dye Shirts
Before you get started, gather all your supplies. Running out of rubber bands mid-activity is nobody’s idea of fun.
Here’s your complete materials checklist:
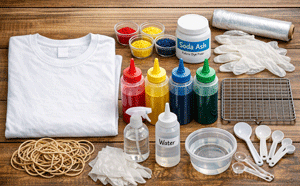
- Fabric dye in various colors (available at drug stores or department stores)
- Rubber bands
- Rubber gloves
- Marbles or coins
- Large buckets or dish bins
- Tap water
- Plastic squeeze or spray bottles (optional but helpful)
- T-shirts imprinted with your group’s name or logo
- Plastic table covers or large trash bags to protect work surfaces
A few planning tips: When working with younger kids, choose non-toxic, kid-friendly dye options where possible. Encourage everyone to wear old clothes to the event—even with gloves, dye has a way of finding its way onto things it shouldn’t.
Preparing Shirts and the Workspace
A little preparation goes a long way. Setting up a smooth workspace before participants arrive will keep the activity running efficiently—and minimize chaos.
Preparing the T-Shirts
Before twisting and dyeing, lightly dampen each shirt with water. A damp shirt absorbs dye more evenly than a dry one. For best results, pre-wash the shirts to remove any finishing agents that manufacturers apply during production. This step is optional, but it does improve how well the dye sets.
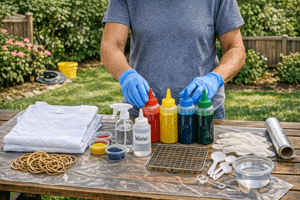
Setting Up the Workspace
Designate a specific tie-dye area—ideally outdoors or in a well-ventilated space. Cover all tables and surrounding floor areas with plastic table covers or trash bags to protect surfaces from staining. Organize dye colors, rubber bands, gloves, and other materials in clearly labeled stations so participants can easily access what they need.
Safety reminder: Make sure everyone wears rubber gloves throughout the dyeing process. Work in a well-ventilated area, especially when mixing dye.
Creating Tie-Dye Patterns
Here’s where the fun begins. The pattern you create with your rubber bands and folding technique will determine the final design on your shirt. There’s no single “right” way to do this—experimentation is part of the process.
Basic Steps
- Start with a lightly damp shirt laid flat on your protected surface.
- Twist or fold the shirt into your desired pattern.
- Secure the twisted or folded sections tightly with rubber bands.
Pattern Techniques to Try
Spiral: Pinch the center of the shirt and twist it into a flat spiral, then secure with rubber bands in a grid pattern.
Crumple: Scrunch the entire shirt randomly into a ball and wrap rubber bands around it. Great for a more chaotic, abstract design.
Stripe-style folds: Fold the shirt accordion-style lengthwise or widthwise, then secure with evenly spaced rubber bands for a striped effect.
For extra texture and detail, tuck coins or marbles into sections of the shirt before securing with rubber bands. These create small circular patterns in the finished design. Kids especially love experimenting with this technique.
Encourage each participant to come up with their own approach. Half the appeal of learning how to do tie-dye shirts is the freedom to make each one completely personal.
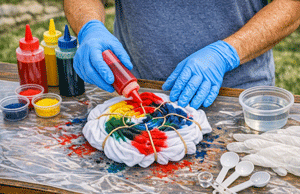
Mixing and Applying the Dye
Once the shirts are all twisted and banded, it’s time to mix and apply the dye.
Preparing the Dye
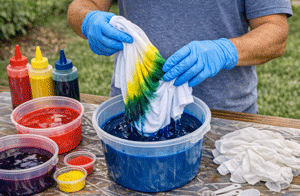
Mix each color according to the package directions. Set up a separate bucket or bin for each color so they don’t contaminate one another. Multiple colors produce more vibrant, dynamic results—so encourage participants to pick at least two or three.
Applying the Dye
There are a few different methods for how to dye tie-dye shirts:
- Dipping: Submerge specific sections of the shirt into a color bucket and hold them there for at least 15–20 minutes. The longer the shirt stays in the dye, the darker and deeper the color becomes.
- Multi-color dipping: Dip different sections into different color buckets. Keep each section submerged for a minimum of 15 minutes before moving to the next color.
- Squeeze or spray bottles: Fill bottles with mixed dye and apply directly to targeted areas of the shirt. This gives participants more control over color placement.
Tip: Try to avoid overlapping too many colors in the same area. When unrelated colors mix, they can produce muddy brown tones that obscure the design. Keep it intentional.
Setting, Rinsing, and Finishing the Shirts
After the dye has been applied, patience is key. Rushing this stage can lead to faded, uneven results.
Setting the Dye
Allow the dye to sit according to the timing guidelines on your dye packaging. In general, a longer setting time means richer, more saturated color. Many groups allow shirts to sit for a few hours or even overnight before rinsing.
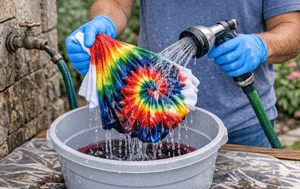
Rinsing the Shirts
Once the setting time is up:
- Remove the shirt from the dye or dyeing surface.
- Rinse under cold running water.
- Wring the shirt repeatedly until the water runs clear.
Cold water helps lock in the color and prevent excessive bleeding. Avoid hot water during the rinse—it can cause colors to run and blend in unwanted ways.
Revealing the Design
Carefully remove the rubber bands and any marbles or coins, then gently unfold the shirt to reveal the design. This is always the most exciting moment of the activity—no two shirts ever look quite alike.
Hang shirts to dry completely before wearing or packing up to take home.
Creative Ideas and Group Use Tips
Once you’ve mastered the basics of how to make a tie-dye shirt, there’s plenty of room to get creative. Color combinations, pattern placement, and folding techniques all affect the outcome—and experimenting with different approaches makes every batch of shirts more interesting.
Group Coordination
To maintain a cohesive group look while celebrating individual creativity:
- Start with the same base shirt: Use the same shirt color and logo for everyone. White or light gray shirts tend to produce the most vibrant results.
- Let designs vary: Don’t prescribe a specific pattern. Allow each participant to create their own. The group logo ties everyone together; the tie-dye sets each person apart.
Ways to Use Finished Shirts
Tie-dye shirts have a surprisingly long life after the activity itself. Finished shirts work great as:
- Camp uniforms for the remainder of the season
- Spirit day gear for school events
- Keepsakes from field trips or lock-ins
- Event shirts for track and field days, dances, or sporting competitions
They’re functional, memorable, and genuinely one-of-a-kind.

Bring Your Group Together, One Shirt at a Time
Knowing how to tie-dye shirts is one thing. But what makes a group tie-dye activity truly special is the process—the mess, the anticipation, the reveal. Every participant walks away with something they made themselves, wearing proof of a shared experience.
The steps are straightforward. The materials are affordable and easy to find. And the results? Always worth it.
Ready to plan your next group tie-dye activity? Share your favorite color combinations and pattern tips in the comments below, and let us know how your group’s shirts turned out. We’d love to see what you create.
2 comments
Comments are closed.